Computer science
Programming and coding
An interesting TED video discussing the benefits of teaching children code.
I have less knowledge in the computer science area of the computing curriculum. Therefore, I shall introduce the curriculum objectives in relation to computer science, explain the terminology and suggest ways that I have found to teach it effectively. The research I conduct and provide below should hopefully enable me to teach programming and coding competently. I have included a number of videos which I have found useful and insightful whilst researching the computer science aspect of the curriculum.

Key stage 1:

Understand what algorithms are; how they are implemented as programs on digital devices; and that programs execute by following precise and unambiguous instructions.
An algorithm is a precisely defined procedure.’ (Computing at School, 2013)
A set of instructions or rules, for carrying out a certain task.
Barefoot Computing has a super video for teachers on the concept of algorithms:
http://barefootcas.org.uk/sample-resources/algorithms/
Computer programs are also made up of series of instruction, however, they have to be written in a language that a computer can process. The central processor of a computer can only recognise a limited series of instruction transcribed in machine code. These type of instructions are very hard to write, so programming language was created. This programming language combines both algorithms and machine code. This programming language also includes aspects of English, which means it is much easier to read and write compared with pure machine code. These programs are made up of statements consisting of a limited set of vocabulary with precise meaning.
There are several different programming languages and the most common programmes used in schools are Scratch, Kodu and Logo.
Create and debug simple programs.
Children can understand what algorithms are, and how they can be used as a program, by attempting to write programme code themselves. Programming includes deciding what you want the computer to do and translating it into a set of instructions the computer can process. Programming usually takes several attempts to get the program to do what you require. This means that we have to think logically about what mistakes could have been made and fix them. These mistakes are known in computer science terms as 'bugs'.
Fixing bugs is known as 'debugging'.
Barefoot computing again provides helpful information in relation to debugging. I found most useful the fact that children need to persevere and try and fix the problem themselves. The teacher is not aiding their learning if she always debugs programs for them. I also liked the idea of creating a set of rules for debugging with the class, so they feel confident and know how to approach it.
http://barefootcas.org.uk/barefoot-primary-computing-resources/computational-thinking-approaches/debugging/
Thinking algorithmically; have a certain idea of what you want a program to do and how you want it to do it.
Before they can start programming, children need to first understand how to think algorithmically. This means they need to understand that they need to include exact details. Furthermore, they need to understand what kind of mistakes they could make and how to fix them.
The video below is a great example of how to get children to start thinking algorithmically. It is also an example of 'computing unplugged' ,where concepts within computer science are taught without the use of technology.
| Lesson Plan Algorithm |
L.O.: To write an algorithm (accurate sequence of instructions) so that sandwich bot will make a jam sandwich.
The lesson plan connected to this video (provided by http://www.code-it.co.uk/ ) is very useful and a great place to start when planning. It is also provides a good opportunity for children to understand what accurate instructions are. It is also a way for children to start refining and debugging instructions after they have been tested.
Bee-Bots
Programmable floor robots and a great starting point for learning directional language, control and programming.
The video below shows a range of activities using Bee-Bots. In particular the first year 2 activity appears to be very effective and useful. Children are thinking algorithmically, by using command cards to formulate a clear set of instructions for the route the Bee-Bot should take. Furthermore, the children are working collaboratively!.
Barefoot computing has created many detailed lesson plans to help teach the new curriculum. It has some brilliant acitivities using Bee-Bots.
It is great for teachers to teach themselves about the concepts and approaches within the programme of study. The resources available are mapped to the programmes of study. It breaks down curriculum objectives and outlines ways it can be achieved. Furthermore, it is hugely helpful since it provides curriculum and cross-curricular links, differentiation ideas and ways to assess learning. I will definitely be using this website to aid my understanding and planning of computer science lessons.
http://barefootcas.org.uk/barefoot-primary-computing-resources/concepts/programming/ks1-bee-bots-12-3-programming-activity/

Daisy the Dinosaur or Scratch Jr are a great way to introduce KS1 children to computer programming.
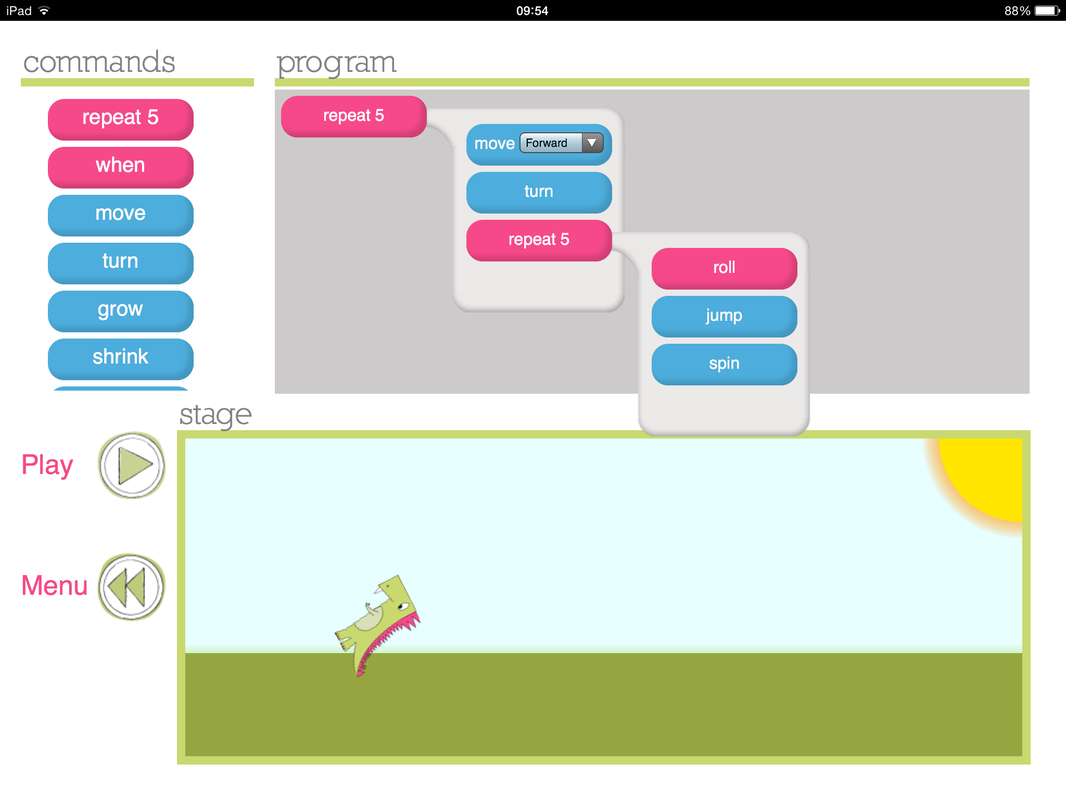
Daisy the Dinosaur is a great app but can only be used on an Ipad. It uses the idea of simple programming to get Daisy the Dinosaur to move. Children are provided with a list of pre written commands and these can be dragged into and joined together in the program box.
The challenge mode is a great feature for beginners. Children are gradually shown the many ways they can programme Daisy the Dinosaur.
There is also a Free-Play mode where children can apply what they have learnt in the challenge mode and create their own animations.
I explored Daisy the Dinosaur myself, it was extremely user friendly and simple to use. I think it is a great app to introduce children to code. However, not all schools have access to Ipads or enough for whole class use.
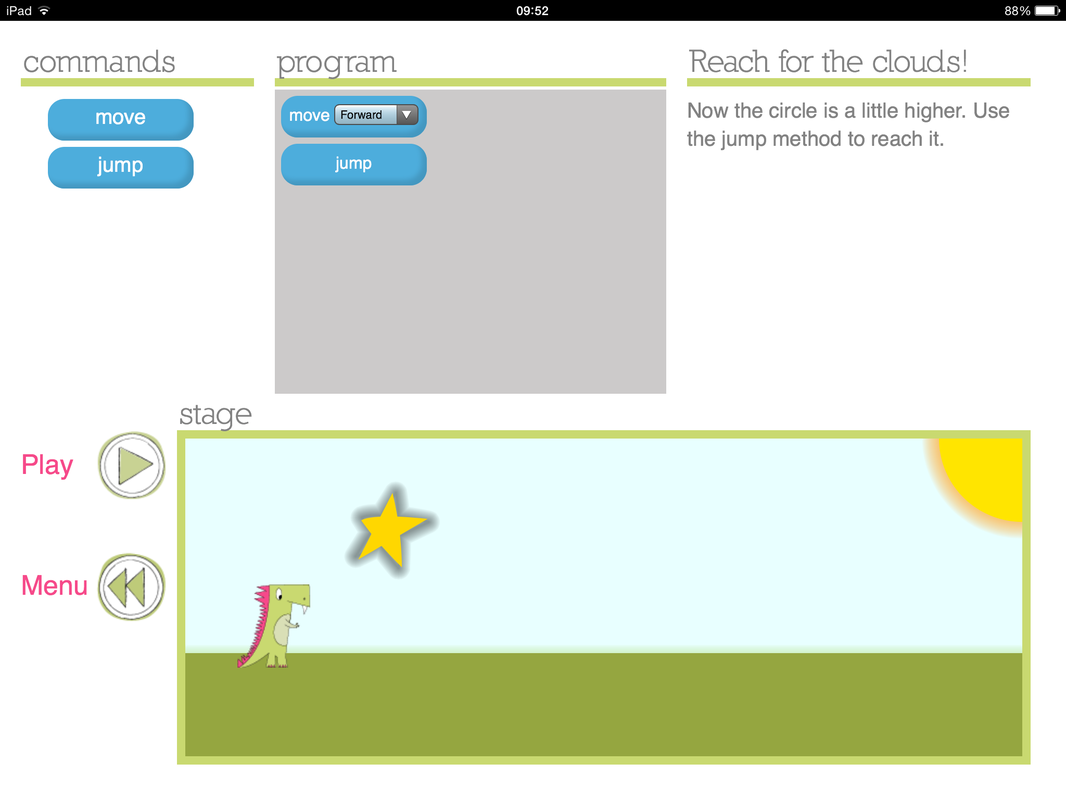
Challenge Mode
|
Free-Play Mode
|
Scratch Jr is also only currently available as Ipad app but they are hoping to release a web version later this year. This app allows children to do far more than the Daisy the Dinosaur app. Children still connect programming blocks together but it is far more modifiable. It is a great next step for children after Daisy the Dinosaur. It is age appropriate for KS1 (5-7 years) and allows children to create their own interactive stories and games.
However, this app is more complex and would need modelling and explanation. Help cards explaining what icons mean and how to do certain things may be a useful resource for children. Steps to success or a check list may also be helpful. Although, children should also be given the chance to have a 'tinker' and explore what the app might be able to do.
Another great feature of Scratch Jr is a website providing activities to help learn how to do things with scratch. http://www.scratchjr.org/teach.html
Barefoot computing also has a great lesson plan for Scratch Jr tinkering. http://barefootcas.org.uk/barefoot-primary-computing-resources/computational-thinking-approaches/tinkering/ks1-activity-scratch-junior-tinkering/
Use logical reasoning to predict the behaviour of simple programs
The way a computer behaves can be determined or predicted through repeated experiences. If computers are given the same input (set of instructions) they will always produce the same output. Logical reasoning is where a set of rules are followed to guide predictions. Within programming children understand the constraints a program has on the computer. Logical reasoning allows children to explain why things happen. The predictability of computers and programs means that children can use logical reasoning to figure out what a computer program will do. Logical reasoning is also about the ability to justify why the program behaves the way it does and can aid understanding as to why a program isn't working as it should do.
Concrete models are a good way to guide and aid children's logical reasoning. It allows them to build a mental representation of what a program does and how it does it. They can clearly see the algorithm that has been employed. This can be done by children acting out what a floor robot or sprite does according to the program. One child can read out the program step by step while the other child acts it out.
Children should also be encouraged to describe what they think the program they have created or are using will do, before they start it. They should also be encouraged to logically explain and justify their predictions.
Key stage 2:
Design, write and debug programs that accomplish specific goals
In the KS2 programme of study children’s knowledge and experience of creating and debugging is built upon. There is more of a focus on children thinking about the goals and purpose of the program they are creating. They will be designing programs to solve specific goals. In terms of who it is for and what they need it to do. Children could look at examples of programs similar to what they want to create. This can give them an idea of what they might need to include. The design, write and debugging process is step-by-step. Children need to design the program before they can write it, and they can’t debug it without having written it. This could be carried out through a series of lessons. Having a specified goal for children, perhaps one they have chosen themselves, provides a purpose for programming and hopefully ensure children are engaged.
...including controlling or simulating physical systems
Simulation is modelling a real-world or imaginary situation. They can be used to play out a scenario and this type of simulation is characterised by a “What if…?” question. Simulations can be a simple model of a building or more complex like a driving simulator. They can be real world or fantasy. Computer programs make it possible to explore and try real-world situations that would be too expensive, time consuming, dangerous or difficult to do in real life. They can also allow us to act out fictitious, fantasy or unlikely scenarios. Simulations can be interactive and the participant is required to alter an aspect of the scenario. These aspects are called variables. An example of a simulation may be about plant growth and the aspects the user might be able to change would be light and water.
Some simulations can be ‘unplugged’ and acted out without the use of a computer. E.g. Acting out a battle to understand what happened or demonstrating the movement of states of matter.
When designing a simulation pupils should be asked to evaluate what makes a good simulation. Evaluation is helpful when it is based on meeting a number of criteria and on users’ needs. When it comes to simulation children should be asked to consider; the purpose of the simulation, what needs to be included or left out, is it realistic or close to real life, improvements to make it more effective and opportunity available to create it.
A range of topics within the curriculum can use computer simulations to enhance learning. For example, The Solar System, fossilisation or food chains. Cross-curricular topics provide an ideal context and purpose for creating simulations.
The creation of stimulations will be scaffolded and progressive. As pupils gain more experience, practice and knowledge they will need less support.
Barefoot computing provide a great lesson plan for lower KS2 where the abstraction has been predetermined for the children, so that what they need to include at each stage is chosen by the teacher.
This lesson also enables children to learn about and use sequence in their programming.
http://barefootcas.org.uk/programme-of-study/use-sequence-in-programs/lower-ks2-activity-dinosaur-fossil-animation-sequence-activity/
Dinosaur Fossil Animation from Jon on Vimeo.
Use sequence, selection, and repetition in programs

Taken from Barefootcas.org.uk
|
Sequence:
A sequence is a list in which the order or arrangement is important. In programming commands need to be carried out in a specific order for it to function correctly and fulfil its purpose. The importance of sequence can be shown in real life context. A recipe is an algorithm, a precise set of instructions. If a recipe isn’t followed in the correct order the cake may go wrong. For example, adding the whole eggs into a bowl, before following the instruction to crack the eggs into a bowl and throw away the shells. Children need to be able to mirror the algorithm sequence in the creation of their programs. Establishing the sequence for a set of commands in the foundation for creating a computer program. A correct sequence should produce the required outcome. |

As children gain experience and knowledge they size, complexity, and variety of their command sequences will increase. Furthermore they will start to include repetition and selection in their programming.
Selection:
Selection is a type of programming command that determines which aspect of a program will run according to whether a certain condition has been met. For example, In a quiz the type of feedback given depends on whether the user answered the question correctly or not. It allows computer programs to be interactive.
Children can be helped to understand selection when it is referred to as a choice. For example, if it is sunny tomorrow, then I will wear sun cream, otherwise I won’t.
Selection allows us to write programs which have the ability to select which commands to implement. These types of commands are also known as conditional statements. For example, an algorithm for spreading jam on toast will need a ‘stop spreading command’ when the toast is covered.
There are 2 different selection arrangements that can be implemented in programming.
If….then
If….then ….otherwise
An example provided by Barefoot computing of what the selection commands can look like.
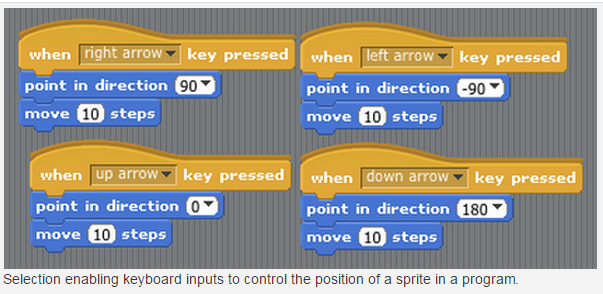
|

|
A great cross-curricular link in which selection can be used, is for children to create a maths quiz for each other. They will be implementing computer skill as well as reinforcing maths learning.
Repetition:
Repetition in programming is where a command for an action or event is repeated a specific number of times or until a condition is met. The repetition of a sequence of commands in a program is referred to as a loop. For example, when designing a quiz, we may want to only ask 8 questions, or we may want to continue until the user has answered 5 questions correctly.
We can use real world examples, to provide children with a concrete representation of what loops and repetition are. For example, a kettle continues to heat the water until it is boiled or a traffic light stays green until we press the button at a crossing. The days of the week is also an example of a loop. Repetition allows programs to be shorter and more efficient.
There are several kinds of loop or repetition in programming:
A Count-controlled loop is where the steps or commands are repeated a pre-set number of times.
A forever loop repeats actions continuously for the entire period that a program is operating.
A Conditional loop is terminated when the condition has been met or occurs. This could be a ‘while’ loop which happens whilst a condition is true. The ‘until’ loop however, terminates the loop when a condition is met.

Taken from: http://barefootcas.org.uk/programme-of-study/use-repetition-programs/repetition/
 Lesson plan utilising various forms of inputs and outputs.
http://barefootcas.org.uk/programme-of-study/control-physical-systems/ks2-classroom-sound-monitor-activity/
Lesson plan utilising various forms of inputs and outputs.
http://barefootcas.org.uk/programme-of-study/control-physical-systems/ks2-classroom-sound-monitor-activity/
Work with variables
Variables
Variables within a computer program are where data can be stored, retrieved or altered. It could be text, numbers or a true or false indicator. Variables keep a log of data that can be changed whilst a program is running. An example could be the score in a quiz.
A useful way to explain variables to children is to use a box analogy. The box holds values that we want e.g. the score. Our variable may have a start value e.g. 0. As the programme is implemented the value of the variable may change if it has met certain conditions. E.g. if they answer correctly then add 1 point to the score value. Only one value can be in the box at one time.
Children should be encouraged to give the variables they use helpful names. This allows them to understand and read their programming code more easily.
In Scratch, designing a variable is quite simple. There is a variable option when writing the script. You simply name the variable and decide if you want the variable to be for just one sprite or all of them. However, a start value isn’t given, so the teacher needs to remind children to allocate a value for the start of the program.
Various forms of input and output
Input is any data sent to a computer from a device. This could come from a keyboard, mouse, microphone, camera or a physical sensor such as a data logger.
Sensors measure data such as temperature or distance. Data from sensors can be recorded or the data can control a program, such as a sensor which detects light and triggers lights to turn on when it gets dark.
Throughout KS2 children should increase their experience and use a variety of input devices, including sensors, in their programming.
MaKey MaKey is a great tool in which children can create their own input devices. It is a circuit board that connects to the computer via the USB port. Objects can be connected using crocodile clips and the objects become touch sensitive. Children can then reprogram keyboard keys or create an instrument. It can be used with many computing language programs.
|
|
|
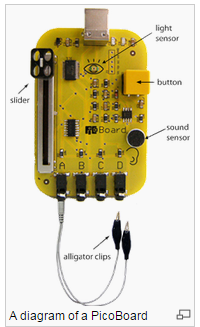
Picoboard is another input device that can be used with Scratch. It has a slider, light sensor, sound sensor, indicator button and alligator clips.
An extensive video providing an online class of how to use Scratch and implement a PicoBoard.
|
|

Scratch is a programming language that lets you create your own interactive stories, animations, games, music, and art.
The Scratch website has many resources and guides to help people learn to use and teach Scratch.
Again barefoot computing has several lesson plans using Scratch, and more to come, that match not only the programmes of study but also have cross- curricular links to History e.g. The Vikings. This is a great place to start and lessons could be adapted to match the topic the class would be learning.
Scratch Overview from ScratchEd on Vimeo.
I used several guidance videos to help me to learn how to use and have a go on Scratch.
|
|
Introduction to Scratch 2.0 from Jon on Vimeo. |
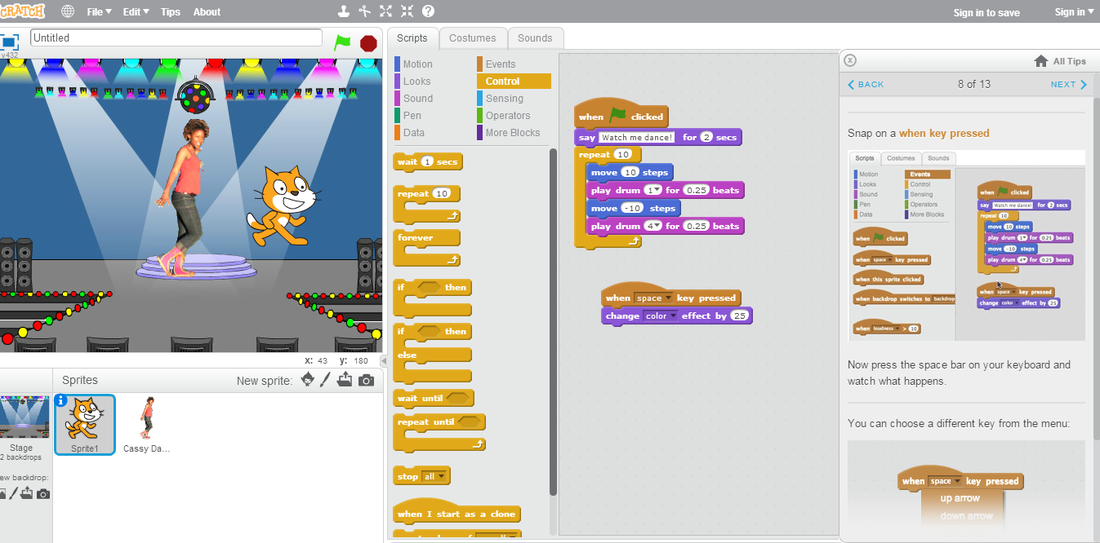
There is also a Step by Step Intro available on the Scratch website which I worked my way through. This is not only a great activity for teachers to start with but, also a useful guide to get children familiar with Scratch. I also like how the different types of commands on Scratch are grouped by colour. This helps make it easy to orientate and remember where to find things. I think, through practice and repeated experiences, Scratch will be easy to use and orientate.
A screenshot of the program I created using Scratch. The Step by Step intro can be seen on the right.
A screenshot of the program I created using Scratch. The Step by Step intro can be seen on the right.
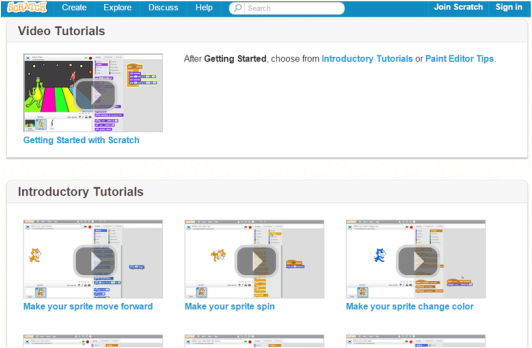
The Scratch website also has many video tutorials, which teachers can use to enhance their own skills or to can be uses within class as a guide for children.

The Scratch website also has brilliant help cards which are a quick and effective way to learn new Scratch code gradually. They are colour coordinated to match the command colours on Scratch and vary in level of difficulty. These can be printed, laminated and used as a resource in class. Children could use them as a tool to help them before they ask the teacher.
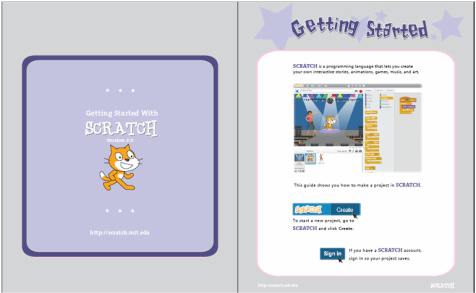
Finally, Scratch have produced a brilliant Getting Started Guide. This 16 page booklet is similar to the Step by Step intro and can be used by children and teachers in order to become familiar with the basics and format of Scratch.
A really super tutorial into the computational thinking and the new curriculum. It suggests tools, programs, lesson plans and support for teaching computing. It also breaks it down into KS1, KS2 and G&T.
Two great websites created by James Abela.
This site matches the new KS2 curriculum and offers some great tools and resources.
https://sites.google.com/site/scratchdayeastresources/ks2-curriculum
This section provides websites with Scratch resources, tutorials and materials.
https://sites.google.com/site/scratchdayeastresources/other-scratch-resource-websites
A great blog by a teacher with helpful knowledge, tips and lesson plan ideas for all areas of the computing curriculum. http://www.simonhaughton.co.uk/ict-lessons/
